SCENERY
PAINTING FOR THE AMATEUR MUSICAL THEATRE and PANTOMIME
|
Thanks, Vince" (Villages, at Lynx Creek Drama Club, Nr Prescott, Arizona)
Hi Vince, Thanks for the email....First off ....WHAT TO PAINT
A solid wall of old wooden planks is a little claustrophobic for the audience. The advice given to artists is to give the viewer's eye somewhere “to escape” such as a window or partially open door.
Not knowing your play I can’t advise on the type of window (high up?) or sort of door (off its hinges?)
Details are what will make your scenery come alive.
Extra planks and patches.
Extra supporting beams at crazy angles.
Some of the planks will have rotted letting the light through.
Then there will be the back of the door where people would have cleaned old paint brushes so here’s a chance for some contrasting colours with perhaps smears of red or green.
Are we talking arid desert here? If so the planks will be grey/yellow and sun bleached. Whereas in a more lush atmosphere the planks will be various shades of brown with even some green mould.
If possible, assemble your flats as they will appear on the stage and work on them all at the one time hopping from one side to another so you get the random effect of the planks. (I attack brick walls in the same manner). This way will enable you to also darken and dirty down any corners where flats meet each other at angles (Returns and reveals). But ensure your flats are assembles in the theatre in exactly the same position otherwise you will have clean areas lines appearing in these corners. So take some paint and cloths with you to the theatre to rectify these errors.
Decide what treatment you plan to use i.e. “artistic” or “cartoon” These
are my own terms for the two systems. “Artistic” is painting
using shadows, atmosphere, perspective etc. Whereas “Cartoon” is
the use of a black (or dark colour) outline with the colour filled
in. I personally rarely use outlines. There’s no such thing in
real life. Outlines give a commercial, children’s book illustration
effect. (See “Santa’s Workshop” on this site). However
outlines help to define the objects in your scene so are a quick shorthand
way of painting scenery.
OK let’s get on with the work.
Mark up your scenery with chalk. Now with a large brush ( mine is five
inches wide for this task) attack each plank separately. Altering the
colour so the planks do not all look the same. I will use a fairly
light hue for this base coat – various shades of yellow. Now
attack uprights pillars and beams in the same manner. Let it all dry.
| Attack only a few planks/pillars at a time as you now have to work
whilst the paint is still wet. Prepare your tools which will either
be lots of scrunched up newspaper or a comb made from a length of wood
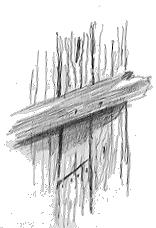
with lots of long nails hammered through it Paint on a much darker coat (brown?) and again vary the colours. Then whilst the paint is still wet run your newspapers or the comb along the “grain” of you wood waggling the paper/comb as you go. This removes some of the paint to let the yellow show through as lines of grain. |
 |
| Of course, if your flats are made of canvas then go easy
on the pressure on the “nail-comb”. Oops! With a small brush now put in some knotholes where the grain goes around these. In real life grains goes around knotholes but I put the knotholes in after I have painted the grain - where I see suitable grain shapes. I also use a lighter colour too on some of these. Now paint in the other objects such as door hinges (broken) and where the rust from those hinges has run down the planking. No doubt rats have also chewed the bottom of the door. Perhaps broken glass in the window, (I use black and paint a very thin line to represent the crack.) |
|
| Now for the shadows beneath the beams and cast by the light coming through the window (if any). For under-beam shadows I use the following technique. This will take a little practice. Pour some dark, almost black, colour into a shallow dish. I then also prepare a separate dish of clean clear water. Dip your complete brush bristles into this clean water. Shake it out to get rid of the excess water then dip just the edge of that same brush into the tray of dark colour. |  |
Paint a spare piece of scenery or board with a few strokes to blend the clean water and colour. I often use the back of the flat for this job. Now, place the colour end of your brush beneath your “beam” and paint along. This then gives a gradual shadow with the darkest part nearest the beam. By the way cast shadows also help to hint at the texture and shape of the object onto which the shadow falls. See how one plank appears to be forward of the others in this sketch. Shadows falling on grass are different from shadows falling on smooth concrete. Then paint in the shadows cast by the light from window or door. These show how high the sun is up in the sky and at what angle the light rays are arriving! |
 |
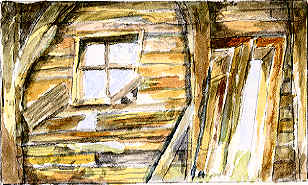
See also the shadow under the door lintel and the angle of the shadow on the reveal of the doorframe. Edges of shadows become more blurred the further away they are from the object casting them. Having finished with shadows it's time to tackle where the daylight is striking edges. Very sparingly pick out edges of some beams/pillars which could be struck by light from the window or door. Do only a few of these. Too many look silly. Once all this has dried, then start to “distress” your scenery. Using your scrunched up newspaper dip it into a dark paint then scrub it along the tops of the flats and down the corners to convey years of dirt and grime. See picture at top of page |
 |
Assuming this is arid desert climate with sun bleached timber, then the final task is to get more scrunched up newspaper, dip into a tray of white and scrub this all over your scenery to give it a thin veil of light colouring.
And when all that is done, what about the odd spider's web in the corners?
Go easy on these and don’t paint a whole web but just put in a few
white/yellow lines to hint the daylight is striking them.
Hope this helps. Regards, Brian
PS A tip. When preparing to paint the sky colour outside of the window, Cover the glazing bars with masking tape and then you can paint your sky without having to paint around the bars. Then once the sky is dry peel off the tape and paint the bars the appropriate timber colour.