A Question about building a tree wing
I am a primary art teacher and am putting
together a set for a school production in July. I want to
create a tree from a pillar that is in our school hall. I want it to
be a stage flat which will create a canopy at the top to then frame the
stage. Could you give me any advice as to where to buy flats that are
large enough as our school ceiling is high and I am not sure if sticking
together A1 card and painting on it will look professional. I am working
to a budget so would like to keep it as cheap as possible. I would be
most grateful if you have any tips or ideas?
I look forward to hearing from you.
Yours sincerely,
Ali ( London)
Hi Ali,
Why not get a friendly carpenter (school caretaker; member of the PTA) to knock you up one? It is very simple carpentry with no joints involved.
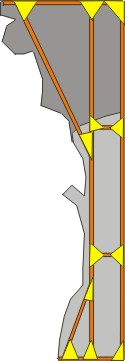
You don't give me any dimensions so I have assumed a 12 foot high flat by 4 feet wide, looking something like this
Adjust your dimensions accordingly.
I have chosen 4 feet wide because that is the width of a sheet of hardboard. From which you'll gather I recommend you use hardboard. (Not if living in the USA 'cos they don't know what hardboard is).
Hardboard is cheap.
Before work, lay your two boards on a flat surface and seal the bobbly side with a mixture of cheap white emulsion paint, a tad of red to colour it, a cup of water to dilute it and a cup of PVA glue. Mix all together until the whole solution takes on an even pink colour. Then paint on the boards and leave to dry overnight.
Meanwhile get your carpenter (unless you are doing the carpentry yourself) to make up a frame of 2" x 1" rough (i.e. not PAR) edge on as per the following sketch. Again, because I don't know the measurements, they will have to adjust accordingly. Screw - not nail- the pieces together.
Temporarily nail your boards -bobble side pink painted- up onto this frame with only a few nails. Do your painting. (Don't forget to leave holes for the "birds to fly through" your tree - Either cut out or paint in a sky) I paint on the bobble side, not the smooth side which is too oily and smooth for me.
Once you are satisfied with your artwork, remove the boards and with a powered jigsaw cut the bottom board roughly to imitate the foliage for the overlap. Note the bottom board overlaps the top one. That way round any top light will not cast a shadow to show up the join.
Nail the boards on properly this time and then, as the last thing you do, cut out the profile edges. Doing this last enables you to make a much free-er painting - rather than having to slavishly stick to a cutout already done.
By the way with my drawing it is as if the hardboard was transparent and you are seeing the supports though it.
Finally with a tall wobbly flat such as this. I recommend nailing triangles of scrap hardboard onto the backs of the frame to give it extra strength. It will be quite a heavy object and you will need help to move it about. When moving a flat upright, on its edge, always hold one hand as high up as possible to steady it. (The flat not your hand)
How you attach this flat to your pillar of course is up to you. |
 |